How to Sell Products Through Google’s AI: From UCP Application to Orders
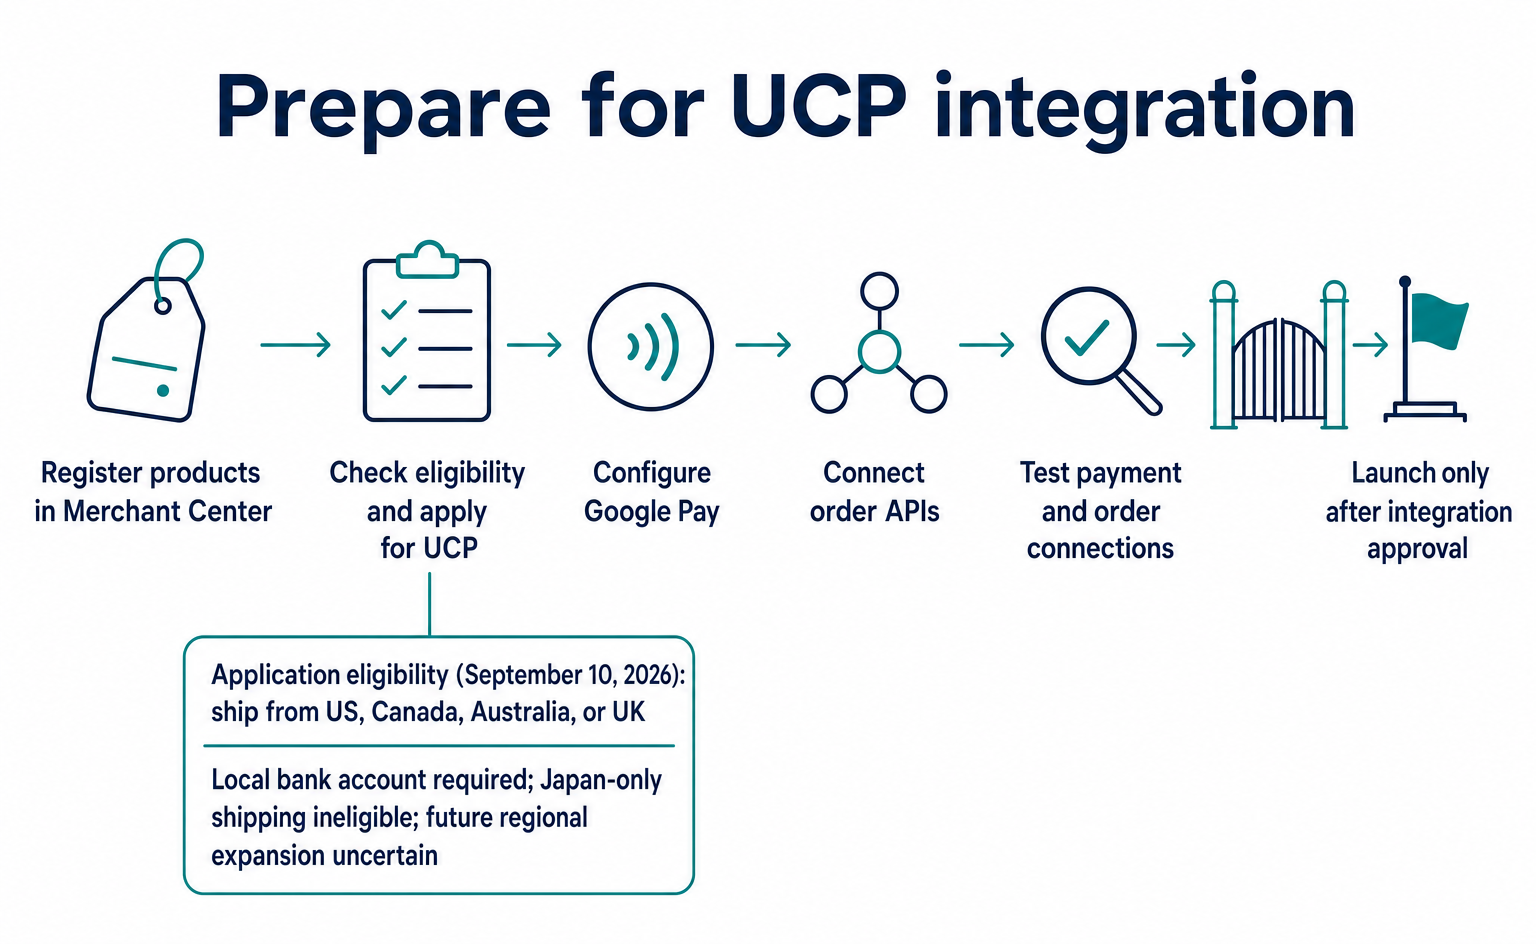
A guide for ecommerce teams to Merchant Center product registration, UCP country eligibility and applications, Google Pay setup, and order API integration. Covers conditions as of September 10, 2026, plus testing and approval checks.
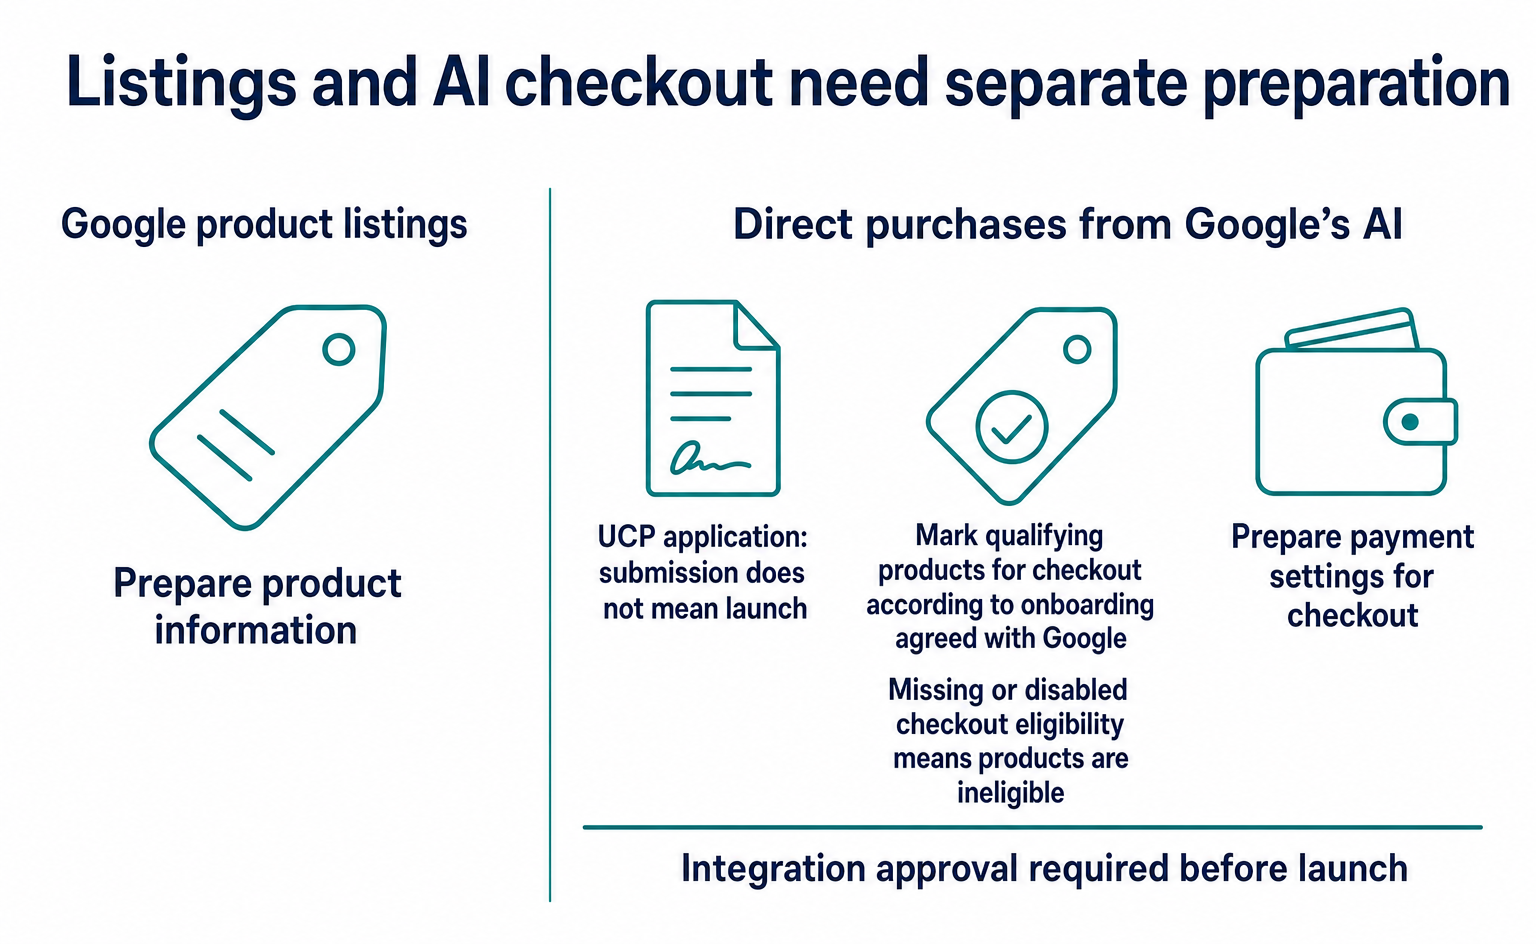
UCP is an integration that lets shoppers buy products directly after finding them through Google’s AI. Merchants send product information to Google and connect orders and payments to their own ecommerce systems. Registering products alone does not enable purchasing. Google’s approval is also required [1][3].
This article is for people who manage product listings and sales for their company’s ecommerce business.
It explains whether your business can apply now, what information to enter, and what to configure after approval. The second half also includes sample order API data for implementation teams.
As of September 10, 2026, the application form is for merchants that ship from the United States, Canada, Australia, or the United Kingdom and have a local bank account. Stores that ship only from Japan do not meet this condition. For those stores, the approach is to prepare product listings first and check whether UCP expands to more regions [11].
The sequence is register products → check eligibility and apply → configure Google Pay → connect order APIs → test and obtain approval to use the integration. This article updates an introductory guide written on September 9 with information checked on September 10. It is not a new announcement made today.
1. Register products in Merchant Center
What do Google, UCP, and the merchant do?
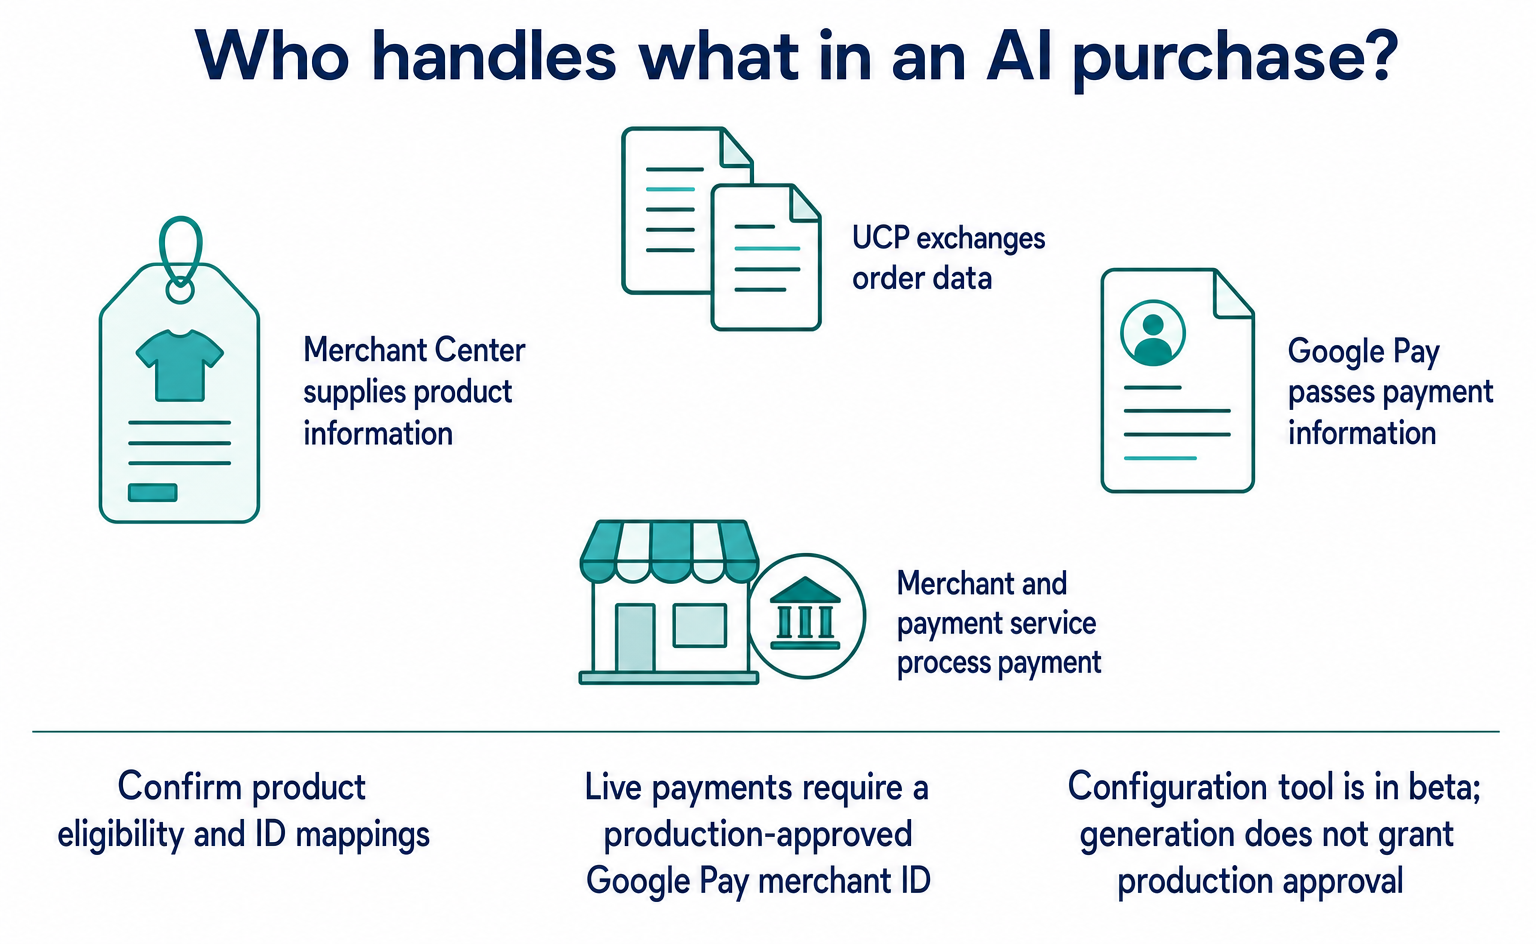
Consider a store that sells water bottles. Sending product names and prices to Google gives Google information it can use to help shoppers find those products. To accept orders within Google’s interface, the store connects its order processing system using the shared rules called UCP [1][3][4].
| Name | Purpose |
|---|---|
| Merchant Center | Where merchants register and update product names, images, prices, stock levels, and other information on Google |
| Google’s checkout interface | Where shoppers review products, delivery addresses, and payment methods |
| UCP | Shared rules that Google and merchants use to exchange order details and amounts |
| Google Pay | A mechanism for securely passing information about the shopper’s selected payment method to the merchant |
| Merchant and payment service | Check stock and amounts, and process payment. The merchant handles the order and shipping |
UCP stands for Universal Commerce Protocol. It is not a product registration dashboard or the name of a payment processor. Google Pay is not a place to register product listings either [4][7][13].
Where to start and what to do
- Open Merchant Center and sign in with the Google account you use for administration. Use your company’s existing account if it has one. Otherwise, create an account by entering your business information and sales methods [15].
- Choose how to supply product information: through an integration with your ecommerce service, a product file, Google Sheets, or another supported method. If your ecommerce system already sends updates automatically, check the source of those updates [15][16].
- To register products using a file or similar source, follow the official help instructions:
Settings → Data sources → Primary sources → Add product source. Select a registration method and enter the sales country, language, and other details. Labels may vary with the account language or interface updates [16]. - Check the import results and fix any errors or reasons for disapproval. Google’s UCP guidance requires a Merchant Center account in good standing and products approved for free listings [12].
Record your Merchant Center account ID, registered product IDs, and free-listing approval status. Registering a product does not mean it is ready for purchase through UCP.
Prepare return policies and contact details too
Set the cost of returns, the return window, and a URL with the full conditions. Register at least one contact option: a contact page, email address, or phone number. These details help shoppers who need assistance after ordering [12].
Start by comparing one product’s ecommerce page with its Merchant Center listing. Check that the color and capacity match, along with the price, availability, and shipping conditions. If automatically synchronized information is wrong, correct the source as well. A change made only in the interface may revert to the old information during the next sync.
2. Check shipping countries and products, then apply to the UCP waitlist
When can a Japanese store apply now?
Open Google’s UCP application form and read the first question about shipping countries. As of September 10, 2026, the conditions are shipping from the United States, Canada, Australia, or the United Kingdom and having a local bank account [11].
Eligibility does not depend solely on the company name or headquarters location. A Japanese company with a shipping location and bank account in an eligible country should explain its actual operations and confirm whether it can participate. If you ship only from Japan, do not claim to ship from an eligible country.
The form also lets applicants select “Japan” as a shipping country of interest. This expresses interest in future availability. It does not mean Japan is currently supported. If you do not meet the conditions, answer accurately and follow the instructions displayed [11].
Exclude unsupported products first
Google provides guidance on products that its checkout feature does not support. Examples include subscriptions, personalized products such as engraved items, used or refurbished goods, and preorders. What the UCP standard can represent is not necessarily the same as what Google’s checkout feature allows merchants to sell [12].
Even if you plan to test with a new water bottle sold through a standard purchase, check the official list of product restrictions. Do not assume that everything sold on your own ecommerce site can also be sold through UCP.
What to enter in the form
After checking eligibility and products, enter the following information in the same application form. This table covers the official form fields that were accessible without signing in [11].
| Field | Information to prepare |
|---|---|
| Contact name / Contact email | Contact person’s name and email address |
| Company/Merchant Name / Website URL | Store or company name and ecommerce website URL |
| Merchant Center Account ID | Account ID checked in step 1 |
| Active offers | The range covering the number of currently active products in Merchant Center, not the number of units in stock |
| Product categories | Categories of products you sell |
| Integration providers | Your current ecommerce or integration services. Select the relevant option if you use none |
| Google sales representative fields | Whether you have a representative and their contact details, if applicable |
| Implementation plan | Ecommerce system to connect, implementation team, available staffing, and schedule |
Finally, read the agreement, including the commitment to begin implementation within 30 days of selection. Confirm that you have a workable plan before agreeing, then select Submit. The 30-day condition concerns starting implementation. It is not a deadline for approval or completion [11].
After submission, follow the confirmation instructions shown on screen or sent by email. Keep a record of the application date, contact details, and submitted information, and watch for guidance from Google. For this article, we viewed the form but did not submit an application.
Completing this step means you have submitted an application. Launching on Google’s checkout feature requires integration approval [3].
3. Prepare eligible products and Google Pay settings
Mark the products you want to sell through UCP
As part of integration setup, you also tell Google which products should be eligible for checkout. The product attribute native_commerce(checkout_eligibility) serves this purpose in the official guidance. Products are not eligible if it is unset or set to FALSE. Configure it for qualifying products according to the onboarding steps agreed with Google [12].
The guidance describes using a supplemental data source to add attributes to existing product information. This lets you attach additional information to registered products. Product IDs must match for the information to be applied to the correct products [12][16].
- In Merchant Center, go to
Settings → Add-ons (アドオン)and enableAdvanced data source management. - Go to
Settings → Data sources → Supplemental sourcesand add supplemental product data. - Prepare the product IDs and additional attributes, and match the corresponding primary data source, language, and data source label.
- After import, check that the information appears on the intended products. Setting the attribute to TRUE does not, by itself, complete participation approval or the checkout integration [12][16].
Also align the product IDs sent to Google with those used by your ecommerce order processing system. If they differ, the official guidance provides a way to map them using merchant_item_id. When configured, this value takes priority during checkout [12].
What does Google Pay provide?
Shoppers select a payment method in Google’s interface. Google Pay securely passes the payment information to the merchant. The actual charge is processed through a supported payment service contracted by the merchant or another supported arrangement. Registering products in Merchant Center does not complete this payment setup [13].
If you already have a Google Pay merchant account, you can reuse it for UCP. Adding a Google Pay button to your own website first is not a prerequisite for using UCP [17].
If you process payments through a payment service, prepare in this order.
- Open the Google Pay & Wallet Console and create a merchant business account or check your existing account. Register your business information and record the merchant ID.
- Check whether your payment service can process Google Pay payment information for UCP. Prepare the service name and merchant ID used for the connection. Do not confuse the Merchant Center ID, Google Pay ID, and payment service ID.
- Follow the official production-readiness guide. In the Console, go to
Google Pay API → Add an integration → Web Integrationand review the terms displayed. The guidance says that if you use Google Pay only for UCP, you do not need to add your domain after accepting the terms [17]. - Open the fields in the Google Pay UCP configuration generator and enter your settings. Check required fields and input errors, then have your implementation team review the generated JSON. The tool is in beta. Generating a configuration does not mean you have production approval [18].
Create test-environment settings first. For live payments, use the merchant ID of a Google Pay account approved for production use. The Direct approach, in which your company decrypts card information, has separate requirements. This article therefore covers setup through a payment service [13][17].
At this stage, confirm eligible products and ID mappings, Google Pay and payment service settings, and the usage status of both test and production environments. Next, tell Google where to find those settings and your order APIs.
4. Publish your order API location and payment settings
The merchant publishes a JSON file that identifies its order endpoint and supported features. Publish it at /.well-known/ucp on your own domain. Google reads this file to find out where to send order data [5].
From here, the explanation follows Google’s 2026-04-08 version guidance. Check newer versions of UCP itself separately from the version used for Google’s integration. Products, addresses, amounts, and IDs are illustrative examples. They use US addresses and US dollars to match Google’s public examples, not to indicate availability in Japan.
The following learning example shows only the connection destination and capabilities. It does not include every setting required for production. Replace endpoint with your own order API URL. dev.ucp.shopping.checkout names the checkout capability, while dev.ucp.shopping.fulfillment names the capability for delivery and other ways of receiving goods [5][6].
{
  "ucp": {
    "version": "2026-04-08",
    "services": {
      "dev.ucp.shopping": [{
        "version": "2026-04-08",
        "transport": "rest",
        "spec": "https://ucp.dev/specification/overview",
        "schema": "https://ucp.dev/2026-04-08/services/shopping/rest.openapi.json",
        "endpoint": "https://merchant.example.com/ucp/v1"
      }]
    },
    "capabilities": {
      "dev.ucp.shopping.checkout": [{
        "version": "2026-04-08",
        "spec": "https://ucp.dev/specification/checkout",
        "schema": "https://ucp.dev/2026-04-08/schemas/shopping/checkout.json"
      }],
      "dev.ucp.shopping.fulfillment": [{
        "version": "2026-04-08",
        "extends": "dev.ucp.shopping.checkout",
        "spec": "https://ucp.dev/specification/fulfillment",
        "schema": "https://ucp.dev/2026-04-08/schemas/shopping/fulfillment.json"
      }]
    },
    "payment_handlers": {}
  }
}
payment_handlers contains payment method settings. It is empty in this example, so the configuration cannot yet accept payments. Add Google Pay settings and a public key for signature verification according to Google’s profile creation example [6]. Do not use the example merchant IDs or keys as your own.
After configuration, open your own https://自社ドメイン/.well-known/ucp. Check that it returns JSON rather than an HTML login page, and that the API URL and supported version are correct. This alone does not mean Google has approved your business [3][5].
The file must be readable without signing in [5]. Do not include private keys or API authentication passwords. Publishing the profile is separate from allowing anyone to call your order APIs.
5. When a product is selected, Google calls the creation API
When a shopper selects Buy (買う), Google sends the product ID and quantity to the merchant’s API. The merchant looks up the product, creates a checkout session, and returns its ID and amounts. The flow is not the merchant calling Google’s API to place an order [7][8].
Combine the earlier endpoint with the following paths. For example, the creation URL would be https://merchant.example.com/ucp/v1/checkout-sessions.
| API to build on the merchant side | Purpose |
|---|---|
POST /checkout-sessions |
Create a checkout session for specified products |
GET /checkout-sessions/{id} |
Check progress or the order result |
PUT /checkout-sessions/{id} |
Update the delivery address or payment method |
POST /checkout-sessions/{id}/complete |
Finalize payment and the order after the final review |
POST /checkout-sessions/{id}/cancel |
Cancel a session before completion |
Updates use PUT, and the path uses checkout-sessions. These differ from ACP’s checkout_sessions and its use of POST for updates. Do not mix examples from different standards [8][9].
Requests also include headers. UCP-Agent identifies the caller’s profile URL, and Request-Id is an identifier used for investigation. For write requests, Idempotency-Key is an identifier that prevents duplicate processing when the same request is sent again [9]. Configure authentication, signatures, and the request-body digest to match your chosen connection method.
The creation data sent when a product is selected looks like the following. Match item.id to the product feed ID. If you have configured a mapping through merchant_item_id, that value takes priority [8][12].
{
  "line_items": [{
    "item": {"id": "bottle_001"},
    "quantity": 1
  }],
  "context": {"language": "en-US"},
  "fulfillment": {
    "methods": [{
      "type": "shipping",
      "destinations": [{
        "address_locality": "Sunnyvale",
        "address_region": "CA",
        "postal_code": "94089",
        "address_country": "US"
      }]
    }]
  }
}
The merchant’s system looks up bottle_001 in its product data and checks whether it is on sale, in stock, and what its current price is. If it receives a product ID that does not exist, it must not proceed with a substitute product.
Save the created checkout session with an ID such as checkout_demo_001. The product ID, checkout session ID, and line item ID within the session are separate identifiers. Save their relationships so updates can unambiguously identify the product being changed.
Return the complete current checkout session
The response includes the checkout session ID, status, currency, line items, amount breakdown, fulfillment options, and supported payment methods. Google also requires links for terms_of_service and privacy_policy [8].
| Response field | Meaning in this example |
|---|---|
id |
checkout_demo_001: the checkout session ID used for later updates |
line_items[].id |
line_001: the line item ID for this water bottle |
currency |
USD: the currency determined by the merchant from the transaction conditions |
totals |
Product charges, shipping, taxes, other components, and the total |
status |
incomplete if information is missing. This is not a completed order |
messages |
Missing information or reasons the purchase cannot proceed |
This table highlights the response fields. It is not a substitute for a complete JSON response. Implement the full response by comparing Google’s creation API example with your own requirements. Return the same information as the saved checkout session rather than generating values solely for display.
6. Recalculate shipping when the delivery address changes
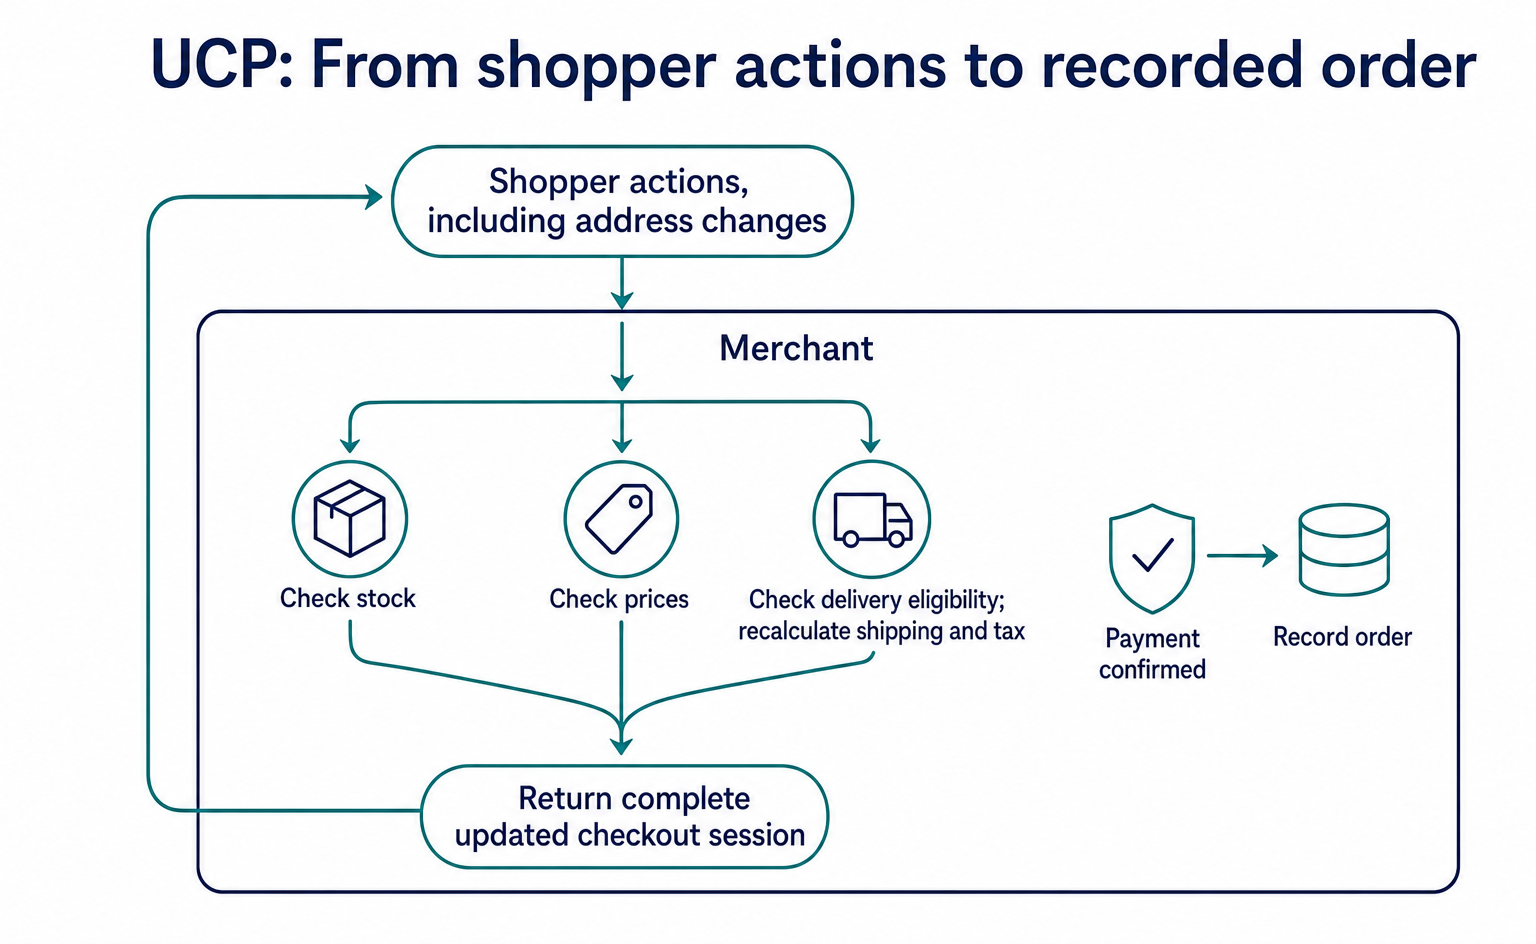
When the shopper enters or changes an address, Google updates the same checkout session. The merchant checks whether it can deliver there, recalculates shipping and tax, and returns the complete updated session [2][8].
The following example updates the address through PUT /checkout-sessions/checkout_demo_001. line_001 is the line item ID returned by the merchant in the earlier creation response. The address change does not create a separate order.
{
  "line_items": [{
    "id": "line_001",
    "item": {"id": "bottle_001"},
    "quantity": 1
  }],
  "context": {"language": "en-US"},
  "fulfillment": {
    "methods": [{
      "type": "shipping",
      "line_item_ids": ["line_001"],
      "destinations": [{
        "address_locality": "Mountain View",
        "address_region": "CA",
        "postal_code": "94043",
        "address_country": "US"
      }]
    }]
  }
}
For example, if the water bottle costs $30 and shipping to the new address costs $5, calculate the final amount including tax and any other applicable charges. Amounts are returned in the currency’s smallest unit, so US$30 is 3000 and US$5 is 500. This is not the same as 3,000 Japanese yen [9].
Return delivery options in fulfillment.methods[].groups[].options. When the shopper selects a delivery method, accept an update with that option’s ID in selected_option_id [8]. Also check incoming IDs so you do not automatically accept a delivery method that was not offered.
Google’s guidance uses ready_for_payment after address and shipping calculations, and ready_for_complete after checking all required information, including the payment method [7]. Neither status should count as a completed order.
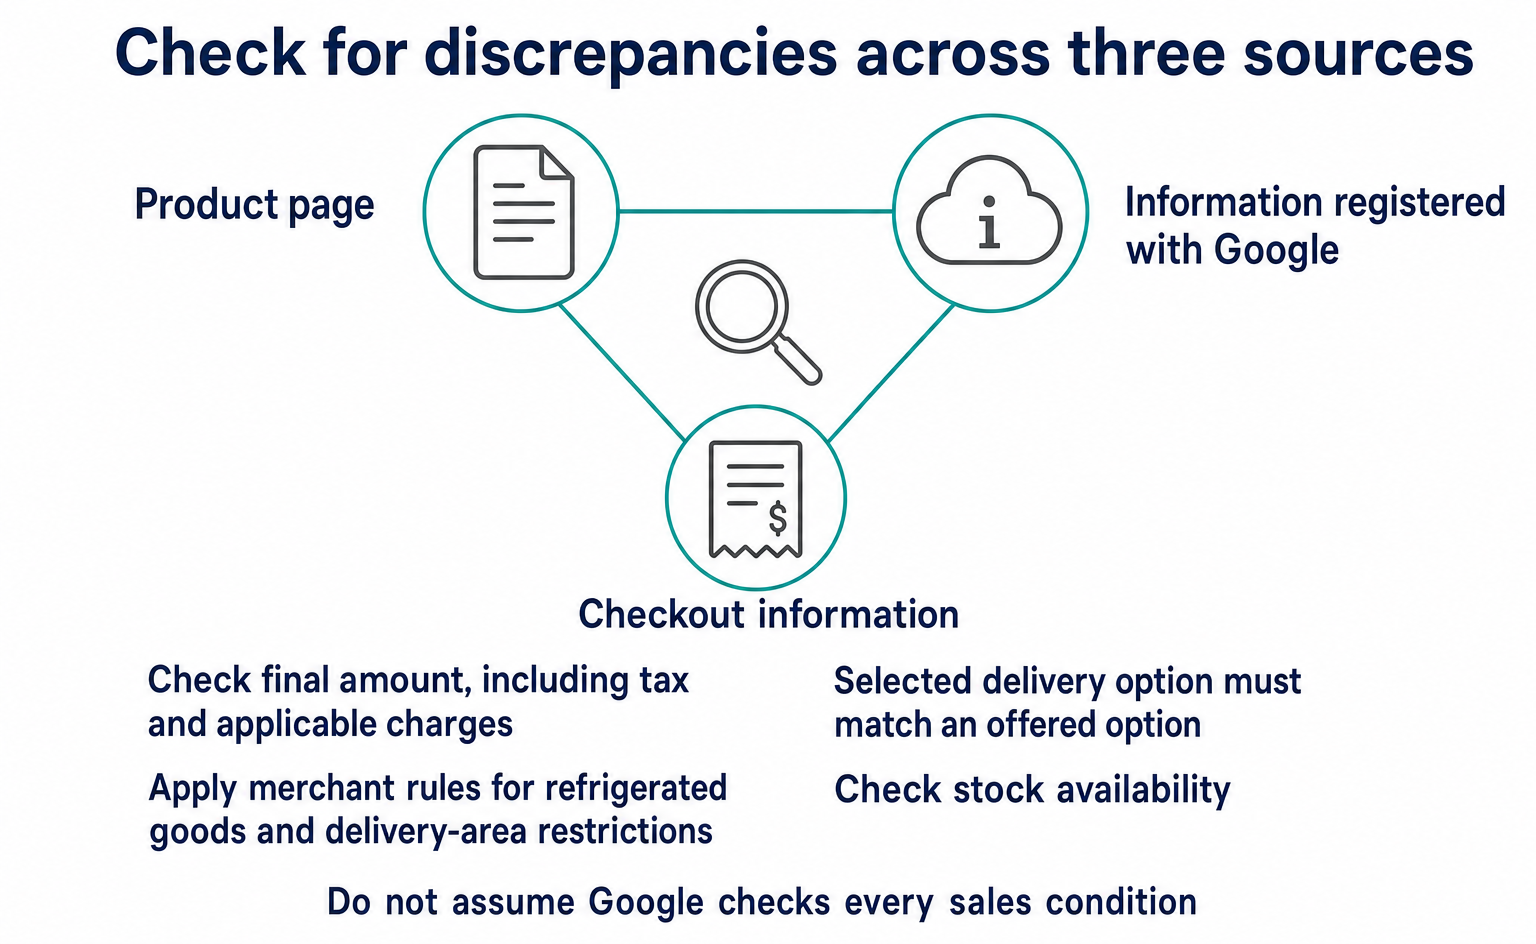
Apply the merchant’s own rules for refrigerated goods and delivery-area restrictions too. Return reasons such as address_undeliverable for an unsupported address or out_of_stock when stock is unavailable [2]. Do not assume Google will check every sales condition in advance.
7. Finalize payment and the order after the shopper’s final review
Start payment processing only after receiving a request to the completion API. In Google’s Native checkout, the shopper reviews the delivery address and payment method in Google’s interface. Google’s guidance says the AI agent does not participate in this information-entry and payment stage [7][8].
In other words, finding a product with AI does not trigger an automatic charge. After the final update, including the payment method, succeeds and the shopper chooses to pay, POST /checkout-sessions/checkout_demo_001/complete is called.
The following example shows the payment data structure. A token is information passed for payment instead of a card number. The sample TEST_TOKEN_NOT_PAYABLE cannot be used to make a payment. Match handler_id to the Google Pay payment handler ID configured by the merchant [8].
{
  "payment": {
    "instruments": [{
      "id": "instrument_demo_001",
      "handler_id": "google_pay_demo",
      "type": "CARD",
      "selected": true,
      "credential": {
        "type": "PAYMENT_GATEWAY",
        "token": "TEST_TOKEN_NOT_PAYABLE"
      }
    }]
  },
  "signals": {}
}
This JSON is a simplified example of the payment portion. In practice, include billing addresses, buyer information, and any other fields required by your business and payment service. Within payment.instruments, extract credential.token from the selected payment method. Do not automatically use the first entry in the array.
Build the merchant-side process in this order.
- Check the session owner, status, and final amount. If it is already complete, return the existing result without creating another charge.
- Match the payment handler ID against its configuration. Begin testing the connection by passing a test token to the corresponding payment service.
- Save the payment result. Once success is confirmed, create the order exactly once and link the checkout session ID to the order ID.
- Return the complete checkout session, including
status: completedand order information. Provide the order’sidandpermalink_urlso the shopper can check the result.
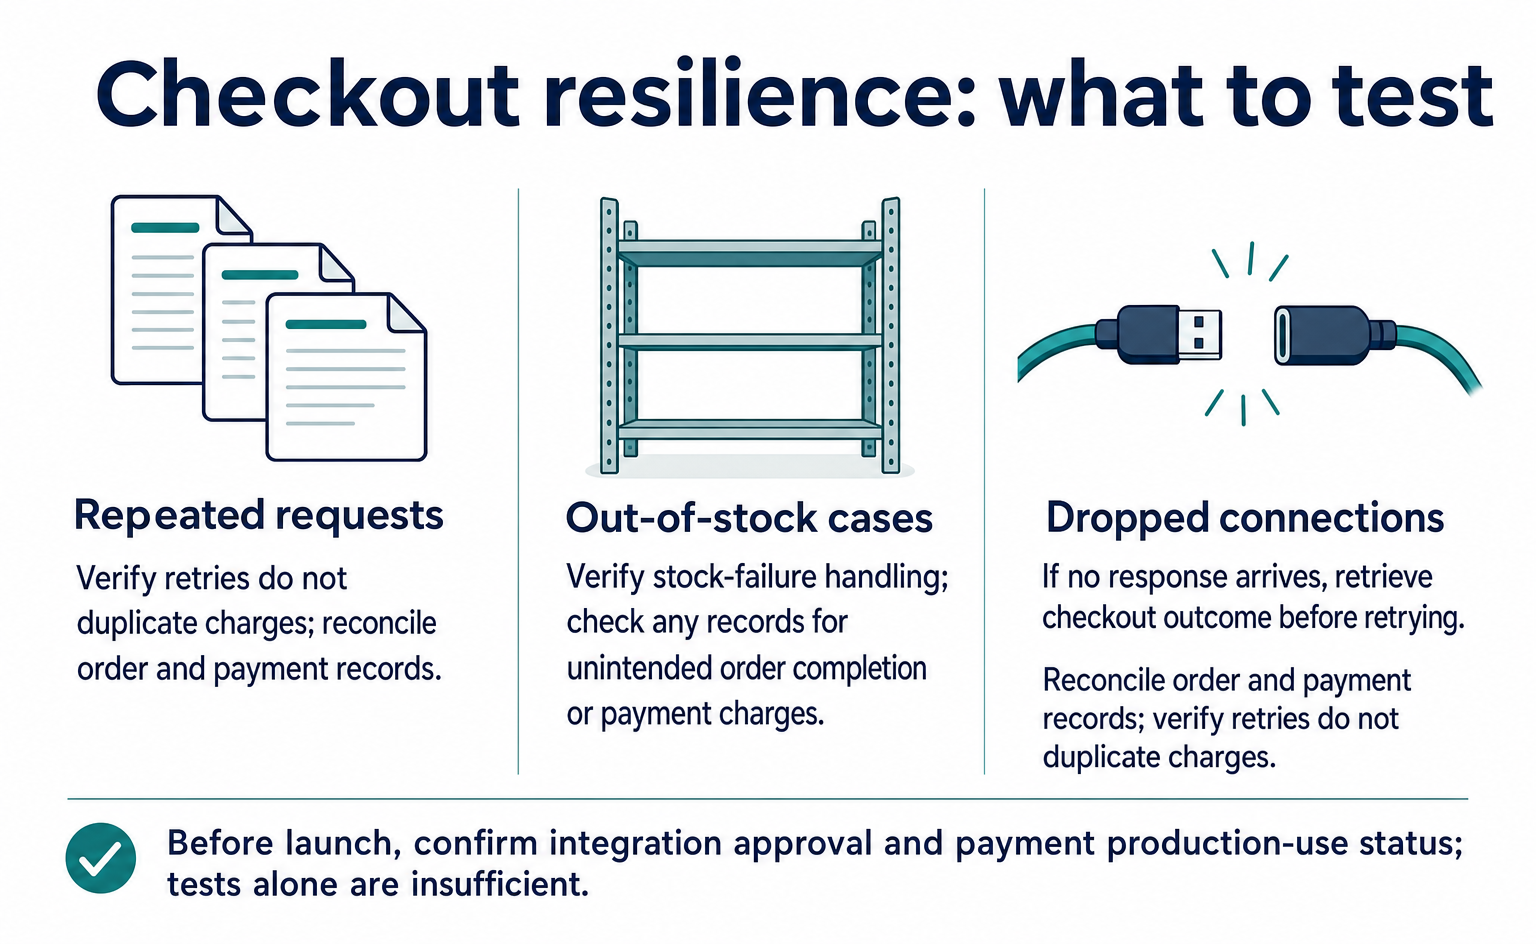
Include safeguards against duplicate charges when the same request is resent. If the result is unknown, query the order and payment records before deciding what to do next. Also make it possible to recover from the payment result if payment succeeds but saving the order fails.
This integration still requires configuration even if you already use Google Pay. Google’s FAQ explains that your payment service must be able to process the token and that the configuration must be explicitly declared in the UCP profile [2]. Do not assume every setting from your existing website transfers automatically.
8. Send order confirmation, shipment, and delivery updates to Google
The merchant continues sending order updates to Google after returning a completed order through the checkout API. Google’s guidance requires notifications for order confirmation, shipment, and delivery. These keep the shopper’s order list aligned with the actual delivery status [14].
- Confirm the
PARTNER_IDandAPI_KEYsupplied by Google during onboarding. Reading the public specification alone does not provide values for your business. - Set up your order and shipping systems to POST the latest complete order data to Google’s notification endpoint. The endpoint is
https://shoppingdataintegration.googleapis.com/v1/webhooks/partners/{PARTNER_ID}/events/order. You can pass the API key in theX-Goog-Api-Keyheader [14]. - Send notifications when the order is confirmed, shipped, and delivered. Include the tracking number and tracking URL at shipment, and preserve the sequence from shipment to delivery. Do not mark an order as delivered if it has not actually been delivered.
- Log transmission results and make failed updates detectable. Missing order or checkout session IDs and outdated update timestamps are among the rejection reasons listed in the official guidance [14].
This notification endpoint is a Google-side API. Its direction is the reverse of the merchant-side APIs called by Google in sections 5–7.
9. Test one order from start to finish before launch
Check the JSON structure and the shopper’s ability to complete a purchase separately. First, use a test product and payment environment to run creation, address update, payment method update, completion, and result retrieval in order.
Use HTTPS and configure the authentication method agreed with Google. Google recommends OAuth 2.0 and also publishes guidance supporting API keys [7]. A Google-like string in User-Agent or another field is not enough to establish that a request is genuine.
| Test scenario | What to verify |
|---|---|
| Create a session with a specified product | The product ID matches the registered information, and the merchant’s price and stock information are returned |
| Change the delivery address | Shipping and tax are recalculated under the same checkout session ID |
| Select a payment method | The session moves to ready_for_complete only after required information is checked |
| Finalize payment | Exactly one payment and one order are created, and an order confirmation URL can be returned |
| Resend the same request | No additional orders or charges are created, and the same result can be retrieved |
| Out of stock or delivery unavailable | The reason is returned, and no unconfirmed order is shipped |
| Connection drops midway | Order and payment records are queried, rather than placing another order while the result remains unknown |
This table is an example for acceptance checks after implementation. Do not treat an HTTP success response alone as proof of an order. Compare the status in the response with the actual order record. Test cancellation on a separate, incomplete checkout session, and distinguish it from post-purchase returns and refunds.
The JSON shown here was checked locally against the 2026-04-08 definitions for profile fields and creation, update, and completion requests. Google-specific status names and interface behavior were checked against Google’s guidance. These are not results from connecting to Google or executing real payments. Once your API is ready, also use the SDK and conformance tests linked from Google’s Native checkout guidance, and verify the integration with the connecting party [7].
Before moving to production, confirm Google’s integration approval and Google Pay’s production-use status. Successful tests alone do not mean you can launch [3][13].
After launch, investigate where checkout stops
Before measuring sales, make sure you can trace the process from the initial checkout request through completion. A working connection alone does not tell you whether shoppers can finish buying.
Use the same reporting period and counting rules for the figures you compare. Separate accepted checkout sessions, completed orders, failures, cancellations, and returns. Decide in advance how to count repeated attempts by the same person.
For example, suppose you examine products with many failed purchases and find that requests are concentrated in addresses you cannot deliver to. In that case, reviewing sales-region information and delivery checks may be more useful than adding product descriptions. This is an example of an analytical approach, not a finding from a particular store.
Google also explains how to identify UCP traffic [2]. However, do not substitute request counts for order counts. A single purchase can involve multiple exchanges during intermediate checks. Verify sales against the final order records.
10. Choose today’s task based on your current setup
Start by checking your registration status in Merchant Center and the eligibility conditions in the UCP application form. Use the table below to choose your next step.
| Your current situation | What to do today | Checkpoint |
|---|---|---|
| Products are not yet registered | Prepare a Merchant Center account and product information | You can see the registration results and any reasons for disapproval |
| You ship only from Japan | Prepare product information, return conditions, and contact details, and check for availability updates | You can establish that you do not currently meet UCP’s shipping-country conditions |
| You ship from an eligible country and have a local bank account | Prepare your account ID and implementation plan, then apply | You can retain the submitted information and confirmation instructions |
| Onboarding discussions with Google are progressing | Test Google Pay, connection information, and order processing | You can verify authentication, amounts, duplicate-charge prevention, and post-order notifications |
| Testing is complete | Confirm approval and production settings with Google | You know whether you may launch and which settings to use |
AgentSignal’s AIO Check (AIO診断) can inspect product-page HTML, structured data, and related page information. It does not validate UCP applications, product listings on Google, or checkout API behavior. Use this article for application and integration steps, and AIO Check for improving the pages themselves.
FAQ
- Q. Can a Japanese store participate immediately if it supports UCP?
- As of September 10, 2026, the application form is for merchants shipping from the United States, Canada, Australia, or the United Kingdom with a local bank account. Shipping only from Japan does not meet the conditions. Check your actual shipping locations and bank accounts rather than judging eligibility solely by whether the company is Japanese.
- Q. If my products are already registered with Google, is direct checkout enabled too?
- Not automatically. In addition to preparing products for discovery, you need to check the participation process and connect order and payment processing.
- Q. If we already support Google Pay, can we skip further checks?
- No. Google’s FAQ explains that UCP is a separate integration and that you need to check support for the payment information it uses and the relevant configuration.
- Q. Do I need UCP to improve product rankings?
- Google’s FAQ says choosing Native integration does not affect product rankings. Treat support for checkout and ranking improvements as separate goals.
- Q. Can site visit logs alone measure UCP sales?
- No. Distinguish communications during checkout from completed orders. Verify sales using ecommerce order records and payment results.
- Q. Is the UCP API specification public?
- Yes. You can find it in the UCP GitHub repository and Google’s version-specific implementation pages. This article follows Google’s guidance for version 2026-04-08.
Sources
- [1] Universal Commerce Protocol (UCP) (Google) — accessed 2026-09-10
- [2] Frequently Asked Questions (Google) — accessed 2026-09-10
- [3] Integration overview (Google) — accessed 2026-09-10
- [4] Core concepts (UCP) — accessed 2026-09-10
- [5] Prepare your UCP profile (Google) — accessed 2026-09-10
- [6] Create a UCP profile — 2026-04-08 (Google) — accessed 2026-09-10
- [7] Native checkout overview (Google) — accessed 2026-09-10
- [8] Native checkout REST API — 2026-04-08 (Google) — accessed 2026-09-10
- [9] UCP shopping REST OpenAPI — 2026-04-08 (UCP) — accessed 2026-09-10
- [10] Universal Commerce Protocol公開リポジトリ (UCP) — accessed 2026-09-10
- [11] UCP Integration Interest Form (Google) — accessed 2026-09-10
- [12] Prepare your Merchant Center account (Google) — accessed 2026-09-10
- [13] Google Pay payment handler (Google) — accessed 2026-09-10
- [14] Order lifecycle (post-purchase) (Google) — accessed 2026-09-10
- [15] Get started with Merchant Center (Google) — accessed 2026-09-10
- [16] Create a product data source (Google) — accessed 2026-09-10
- [17] Prepare for production — Google Pay for UCP (Google) — accessed 2026-09-10
- [18] Google Pay UCP Code Generator (Google) — accessed 2026-09-10
About the author
Shogo MizushimaCEO of kairos Inc. / AgentSignal Developer
Develops AgentSignal, a tool for measuring AI crawler visits and AI-referred traffic, and diagnosing AIO readiness. Writes about measurement and practical improvements for AI search using observed data.
Related articles
AI shopping and booking
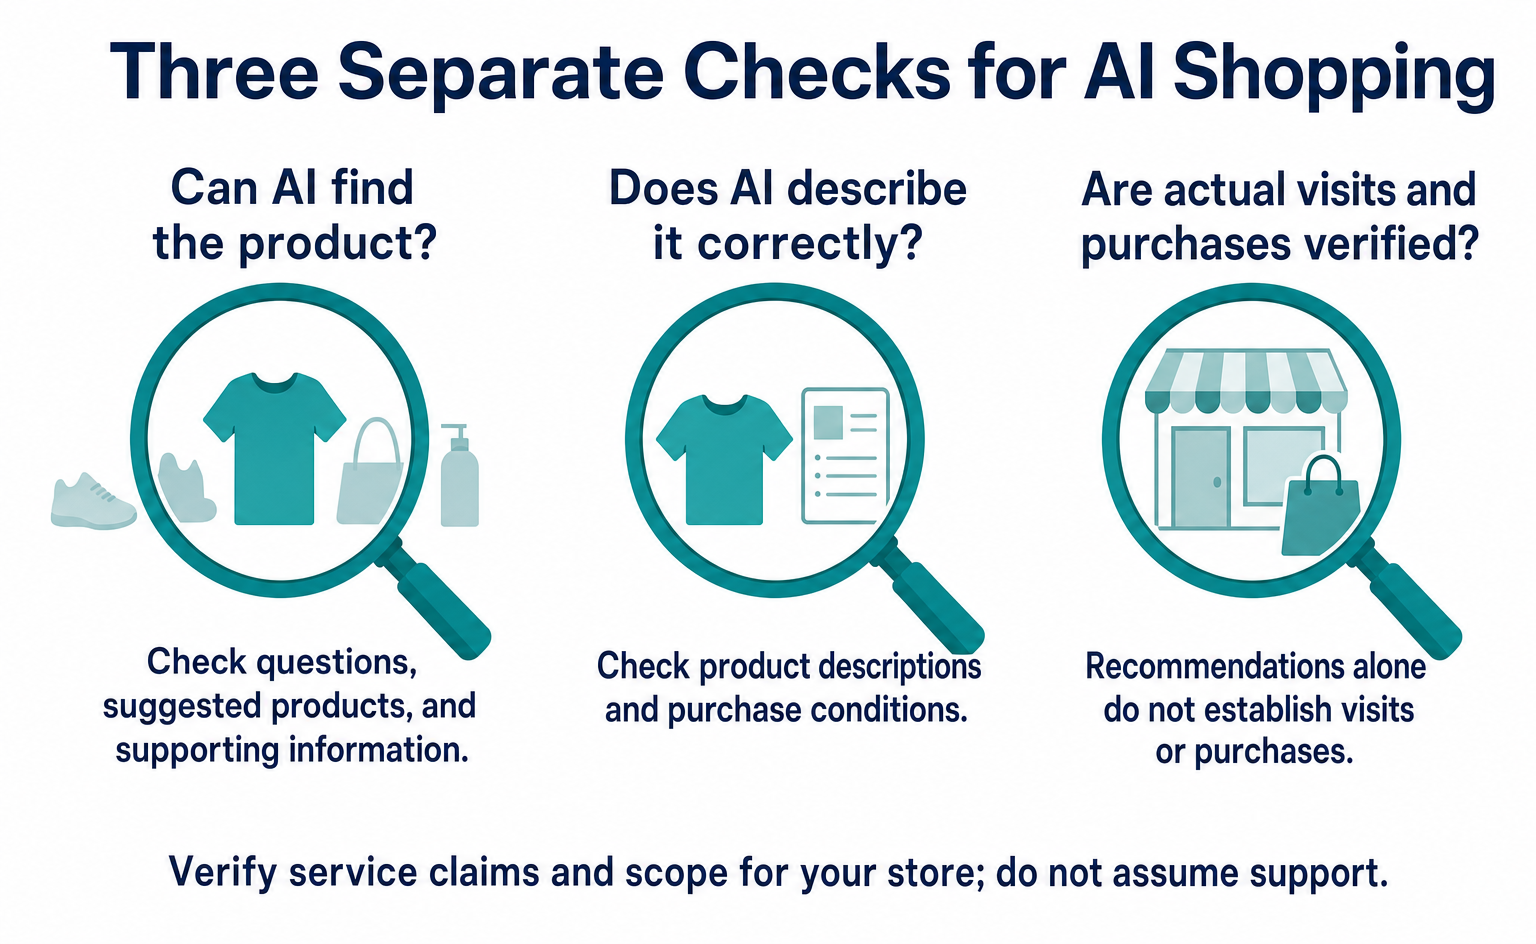
How Can AI Find Your Products? Checks Highlighted by Azoma
Based on Azoma’s September 7, 2026 announcement, learn what to check in product details, pricing, stock, shipping, and returns. Includes questions to test AI answers, ways to investigate errors, and steps to track visits and purchases, starting with a few products.
Published
AIO and AI search
What Are AI Overviews? How to Review Your Former SGE Work
AI Overviews are AI-generated summaries shown in Google Search. Learn how they relate to the former SGE trial, how they differ from AI Mode, why no extra requirements apply, how to review earlier work and how to check the Search Console generative AI report.
Published
AI shopping and booking
51% of US consumers use AI shopping tools. How much has product selection changed?
That does not mean AI placed 51% of orders. It is the share of US consumers who reported using at least one AI-powered shopping tool during the past month.
Published