How to Monitor and Control AI Crawling with Cloudflare
Learn how to use Cloudflare AI Crawl Control to monitor AI crawlers and allow or block each one. Covers free-plan detection and reporting periods, Security/Crawlers label differences, and what to check when access fails even with Allow.
Cloudflare’s AI Crawl Control lets you monitor AI crawlers visiting your site and allow or block each one. It is useful for website and e-commerce managers who want to keep the AI crawlers they welcome while stopping those that do not fit their content-use policies.[1][2]
If traffic for your domain already passes through Cloudflare, you can review crawling and configure individual AI settings in the dashboard. This article uses a mug product page, /products/mug, to explain how to examine access, select Allow/Block, and check the results after a change. Allowing access does not guarantee citations in AI answers or referral traffic.
1. Requirements and Plan Differences
You need a Cloudflare account, a connected domain, and traffic routed through Cloudflare. An account alone is not enough, so first check that the target domain is connected.[1]
| Item | Requirements and differences |
|---|---|
| Allowing or blocking individual AI crawlers | Allow/Block is listed for all plans |
| Detection on the free plan | Identifies known AI through User-Agent, the identifier sent with a request |
| Metrics on the free plan | Shows analytics for the past 24 hours |
| Enterprise + Bot Management | The comparison table lists advanced detection using detection IDs and configurable analytics periods |
| Customizing the block response | Available on paid plans. At least one AI must be set to Block |
| Pay per crawl | A feature for charging for crawling, offered as a closed beta in the reference materials |
When comparing plans, check detection methods, analytics periods, and response customization separately. The getting-started guide compares “All plans” with “Enterprise plans with Bot Management.” This does not mean that every paid subscription provides the same features.[1][2]
If your site is not connected, check the connection requirements in the official getting-started guide. Connecting a new domain and changing DNS settings are outside this article’s scope.
2. Check Crawling on a Product Page
Start by checking which AI crawlers visit your site without changing any settings. Before you begin, have the target domain, the period you want to review, and the product page path ready.
- Log in to the Cloudflare dashboard and select the target account and domain.
- Open AI Crawl Control.
- Check Overview for a summary of AI crawling.
- Narrow the results using the date, AI, operator, hostname, and path filters.[1][2]
For the mug product page, filter the path to /products/mug and see which AI crawlers have recorded visits. Note the review period, target AI, path, and request count so you can compare results before and after a change.
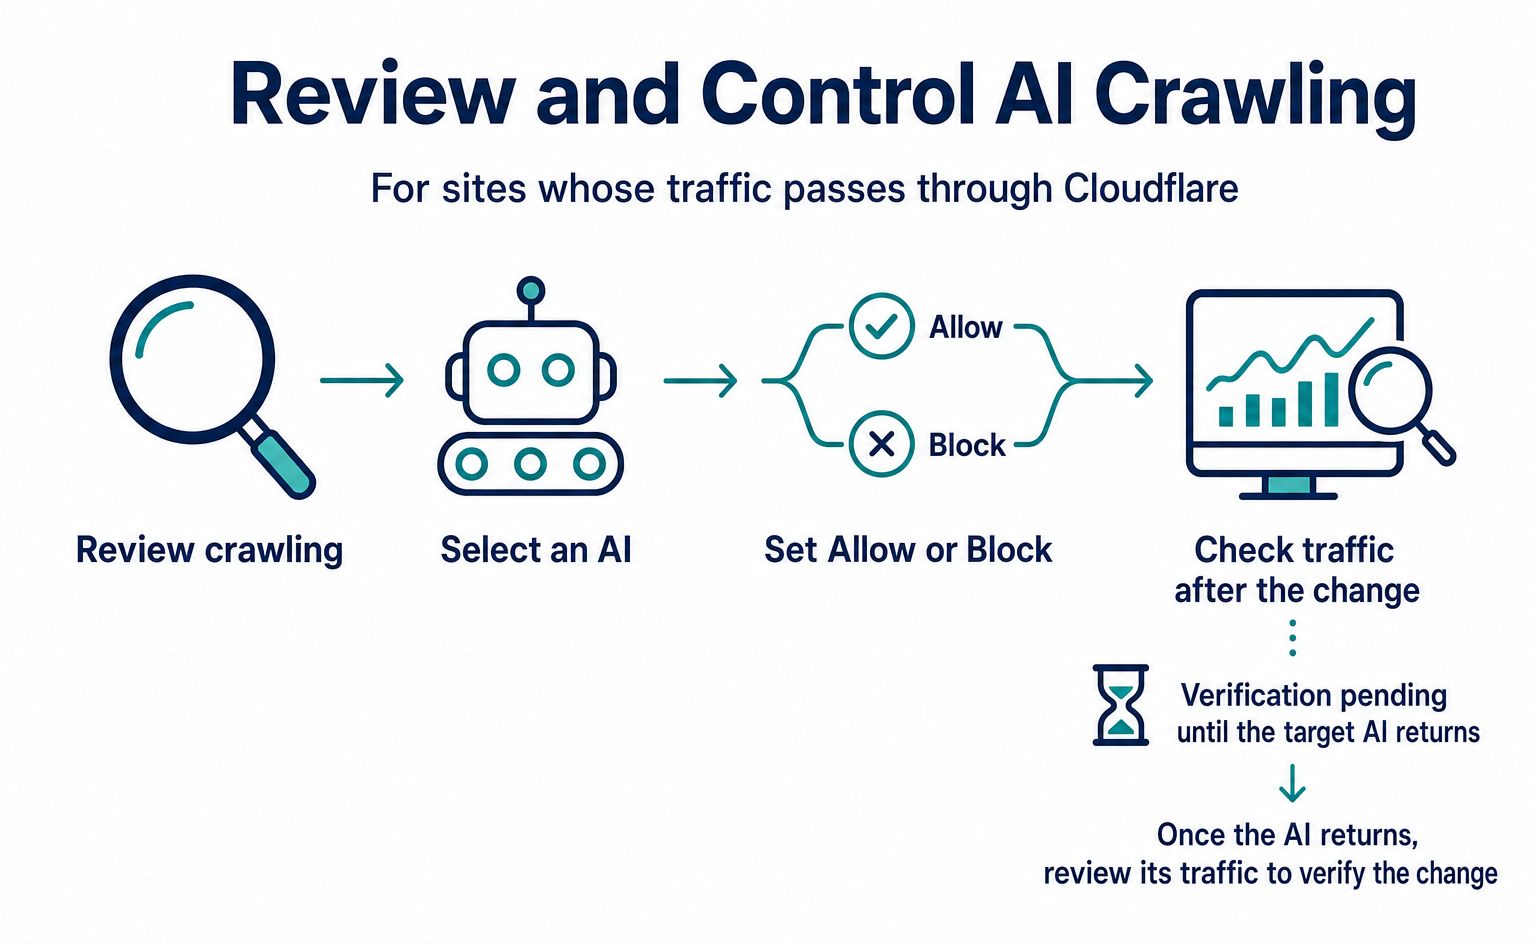
The overall process is: review crawling → select an AI → set Allow/Block → check traffic after the change.
An empty list does not prove that no AI has ever visited. Date and path filters affect what appears, and detection methods have limits. In particular, the free plan identifies known AI through the User-Agent they use to identify themselves.[1]
3. Find the AI List and Action Column
Next, find the list showing AI names, operators, Requests, and Action. Official documents use both Security and Crawlers, so use the list and action column visible in your actual dashboard as your guide.[1][2]
| Official page | Tab instructions |
|---|---|
| Get started (updated April 23, 2026) | View the list in Crawlers |
| Manage AI crawlers (updated July 28, 2026) | The opening instructions say Security; the following list explanation says Crawlers |
You can filter the list by Name for the AI name, Operator for the organization running it, and Category for its type of use. AI crawlers run by the same company may serve different purposes. Check each AI’s name and category rather than treating all crawlers from one company alike.[2]
Requests includes counts of allowed and failed requests. Failures can result from rules outside AI Crawl Control or from response errors. The failed-request count is therefore not the same as the number blocked by this feature.[2]
If you cannot find the relevant list or action column, do not change other settings based on guesswork. The end of this article explains what has and has not been verified about the label differences and the dashboard.
4. Select Allow or Block
In the target AI’s Action/Actions column, select Allow to permit access or Block to deny it. In the mug example, distinguish between AI crawlers you want to accept for citations, referral traffic, or existing contracts and those that do not fit your content-use policy.[2]
Before making a change, note the target domain, AI name, operator, current Action, and reason for the change. If Enforce robots.txt is displayed, record its state too.
- To allow access: Select Allow in the target AI’s action column. The official documentation says Enforce robots.txt can also be used with Allow, but this article does not cover changing that setting.[2]
- To block access: Select Block in the target AI’s action column. Cloudflare creates or updates a WAF custom rule for the target domain to enforce the block. A WAF is a system that restricts traffic based on specified conditions.[2]
- To check the setting: Confirm that the target AI’s row shows your intended selection, and record the time of the change.
Importantly, the analytics path filter does not define the scope of a block. Filtering the view to /products/mug and then selecting Block is not an operation that blocks only that product page. Path-specific exceptions require advanced WAF settings.[1][2]
After configuring the setting, check the target AI’s traffic results in Metrics as described next.
5. Check Results After the Change
Open Metrics to view traffic breakdowns by period, AI, operator, status code, hostname, and path. A status code is a number that indicates the result returned for a request. The free plan shows the past 24 hours, so do not put off checking results after a change.[1]
For the mug example, filter to the AI you configured and /products/mug, then examine the period after the change. If the AI has not returned, you can confirm the setting but cannot yet verify its effect on actual traffic.
| What you see | What to check next |
|---|---|
| Successful requests after Allow | Whether the AI, path, and time period match the change |
| Continued failures after Allow | Possible effects of other WAF rules, bot protection, or response errors from the site |
| Failures after Block | Whether they result from this Block setting, existing settings, or response errors |
| No access after the change | Check again after the target AI returns |
Allow does not remove every other restriction. AI Crawl Control enforces Block through WAF custom rules, which run before Cloudflare’s bot protection. Even with Allow selected, other rules or bot protection may affect requests.[2][4]
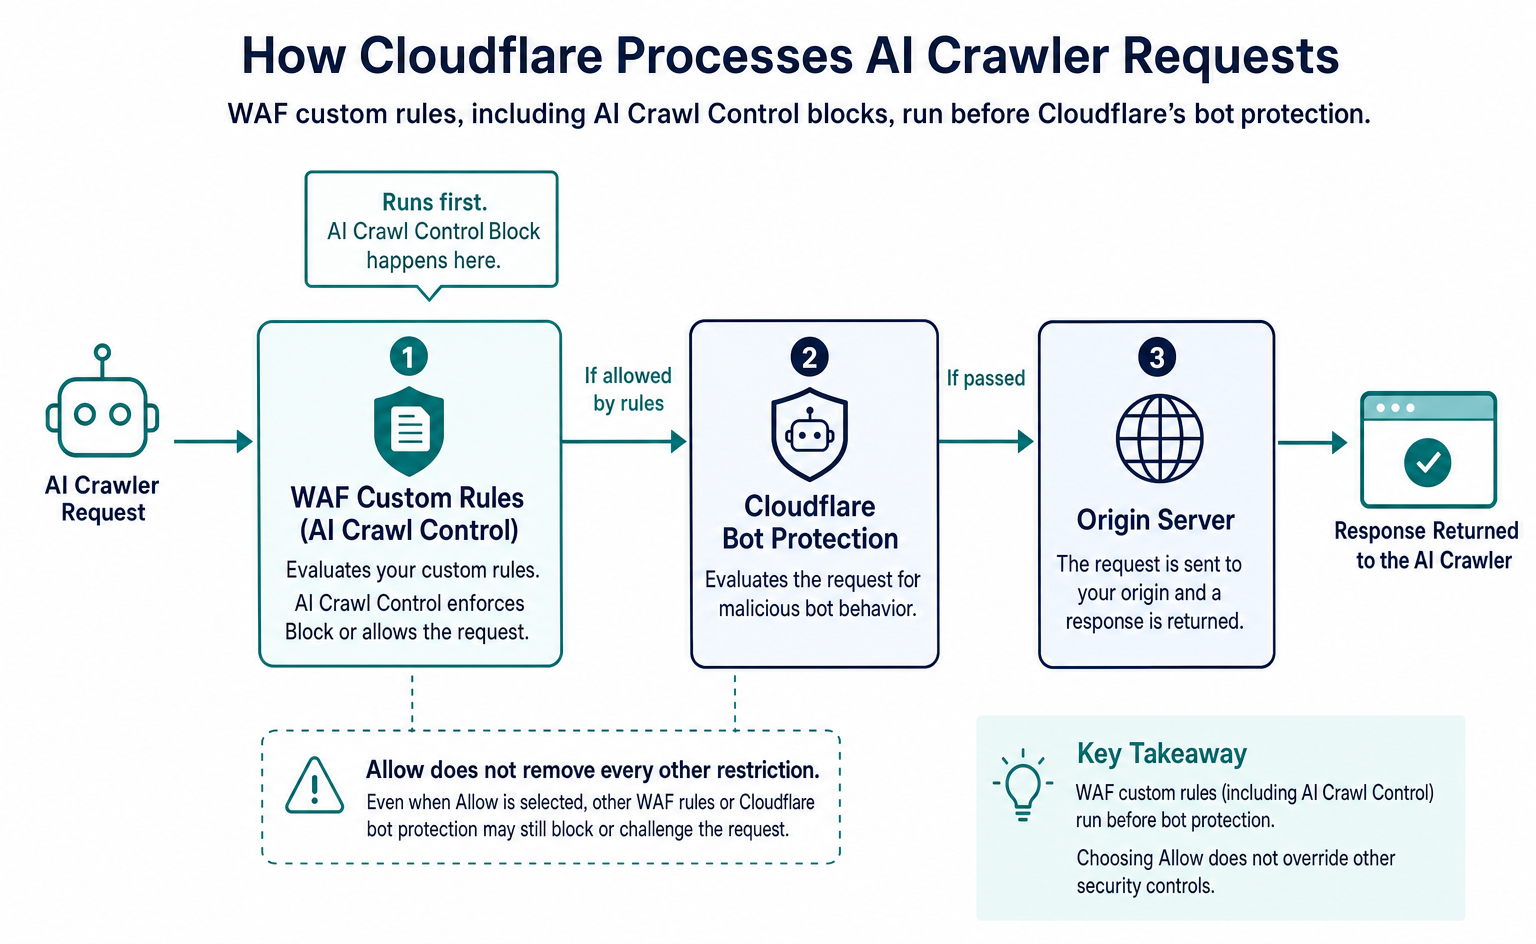
When investigating failures, gather the target AI, path, change time, selected Action, and response results after the change. Compare these with the existing security settings. These are details to record and share with colleagues, not dashboard input fields.
Failure counts in Metrics alone cannot identify which rule applied. Do not disable bot protection across the board without understanding the cause. Review the relevant requests and rules with the administrator.
6. Read the robots.txt Information
Directives shows the state of robots.txt, which tells AI crawlers the conditions for crawling, and requests that do not match those instructions. Writing instructions in robots.txt and denying requests with Cloudflare’s Block are separate operations.[2][3]
Open Directives in AI Crawl Control for the target domain. The status display at the top shows whether Cloudflare manages robots.txt. The documentation says that, when enabled, it includes instructions blocking common AI training crawlers and a Content Signals Policy.[3]
Requests and Status Show Different Information
Robots.txt availability shows access to robots.txt for each hostname. Requests aggregates access during the selected period. Responses below 400 count as successful, including redirects; responses of 400 or above count as failures.[3]
By contrast, Status is the response code returned by a check request to robots.txt. It is separate from the results of individual past requests. A high successful-request count does not establish that the file’s contents are correct.[3]
A Status of 404 means the file was not found during the check request. If you have not placed a file on the site, consider creating one. If it is already there, also check whether security settings such as the WAF are preventing access. On the hostname serving the mug page, check that robots.txt can be read separately from the product page.[3]
Violations Are Compared Against Current Instructions
Robots.txt violations compares past requests against the current robots.txt. It is not a real-time record of violations of the instructions in place when each request occurred.[3]
For example, if you add a Disallow instruction today to block /products/mug, requests that were allowed before the change may appear as violations under the current instructions. Do not conclude from the violation count alone that an AI is still ignoring your instructions after the change. Check when the instructions changed and when the requests occurred.[3]
7. Customize the Block Response if Needed
On paid plans, you can change the response code and body returned when blocking access. At least one AI must be set to Block. This extra step is not required if you simply want to stop crawling.[2]
- Open Settings in AI Crawl Control.
- Go to Block response → Edit.
- Select a response code and enter a plain-text message in Response body.
- Select Save and check the configured values.[2]
The choices are 403 Forbidden, which indicates that access is denied, and 402 Payment Required, which indicates that payment is required. If you have manually set a response code other than 403 or 402 in the WAF, the code selected here may not apply, and the selection field may appear empty.[2]
Selecting 402 alone does not start charging for crawling. The reference materials describe Pay per crawl as a closed beta/private beta. Treat it separately from ordinary Allow/Block settings and block-response customization.[2]
8. Final Checklist
After making changes, check the following items. Recording settings alongside traffic results makes it easier for a new person taking over to understand how decisions were made.
- The target domain, AI name, and operator are correct.
- You recorded the selected Action and the time of the change.
- You checked the target AI, path, and responses in Metrics after the change. If the AI has not returned, you marked verification as pending.
- You kept requests with unexplained failures flagged for investigation.
- If you also changed robots.txt, you recorded when its instructions changed.
Start with one AI and use this process to check that the settings match your company’s policy and to verify the results. Allowed-request counts are not counts of citations in AI answers or purchases. Keep crawling controls separate from your assessment of subsequent traffic acquisition and sales.
Scope of This Guide
This is a basic guide based on official materials as of September 10, 2026. No hands-on dashboard operations or traffic tests were performed. The retrieved official page text did not establish why the Security/Crawlers labels differ or whether an additional save action is required after selecting Allow/Block.
Connecting a new domain, creating path-specific exceptions, configuring Enforce robots.txt in detail, and identifying the rules applied to individual requests are outside this guide’s scope. Before making those changes, check the current dashboard and the relevant official instructions.
FAQ
- Q. Can I block individual AI crawlers on the free plan?
- Yes. The official getting-started guide lists Allow/Block for all plans. You must connect the target domain and route its traffic through Cloudflare. The free plan detects AI through User-Agent and shows the past 24 hours in Metrics.[1]
- Q. Should I open Security or Crawlers?
- The getting-started guide says Crawlers. The management guide says Security at the start, then Crawlers in its explanation of the list. In your dashboard, look for a list with AI names, operators, Requests, and Action. If you cannot find it, do not change other settings based on guesswork.[1][2]
- Q. Does Allow guarantee that the AI can read the page?
- No. Other WAF rules, bot protection, or response errors from your site may affect access. The documentation also says you can use Enforce robots.txt with Allow. After making a change, check the target AI, page, and time period in Metrics.[1][2][4]
- Q. Should I block an AI if its robots.txt violation count rises?
- The count alone is not enough to decide. Violations compare past access against the current robots.txt. Adding a new blocking instruction can therefore cause previously valid access to appear as a violation. Check when the instructions changed, the affected paths, and the access period before deciding.[3]
- Q. If I filter to a product page and select Block, will only that page be blocked?
- No. The analytics path filter does not define the scope of a block. This guide covers Allow/Block for each AI. Page-specific exceptions are described as advanced settings handled through the WAF.[1][2]
- Q. Can I charge AI crawlers by setting the response code to 402?
- Returning 402 alone does not start charging. Customizing the block response is a paid-plan feature that requires at least one AI to be set to Block. Pay per crawl, the charging feature, is described as a closed beta/private beta in the reference materials as of September 10, 2026.[2]
Sources
- [1] Get started(2026年4月23日更新) (Cloudflare) — accessed 2026-09-10
- [2] Manage AI crawlers(2026年7月28日更新) (Cloudflare) — accessed 2026-09-10
- [3] Directives(2026年4月23日更新) (Cloudflare) — accessed 2026-09-10
- [4] AI Crawl Control with Cloudflare Bots(2026年7月1日更新) (Cloudflare) — accessed 2026-09-10
About the author
Shogo MizushimaCEO of kairos Inc. / AgentSignal Developer
Develops AgentSignal, a tool for measuring AI crawler visits and AI-referred traffic, and diagnosing AIO readiness. Writes about measurement and practical improvements for AI search using observed data.
Related articles
Measurement and site improvement
What Are AI Crawlers? Why Blocking GPTBot Doesn’t Remove You from ChatGPT Search
AI crawlers are programs AI companies use to read public web pages. Learn how GPTBot differs from OAI-SearchBot, how Google-Extended works, why visits can continue after a robots.txt block and how to choose settings by purpose.
Published
Measurement and site improvement
What Do Visitors from AI Do? Fix Your Entry Page Based on Their Behavior
People arrive from AI answers, yet enquiries do not follow. Use session recordings to see what happens on the entry page: how to filter recordings to AI referrals, how to use page-wide heatmaps as a supplement, what to fix for each behavior pattern and how to recheck after the change.
Published
Measurement and site improvement
71,147 AI Answers: Why Customer Context Matters for AIO
A persona study shows why AI recommendations need context. Build comparable customer questions, record mentions and links, then improve pages with verified information.
Published